Mass, airtightness, and isolation are what you need to consider if you want to soundproof any area effectively.
Increasing mass against the walls, ceiling, and floor. Sealing all gaps around the room with caulk. Building a “room in room” environment which isolates you from the rest of the building.
In this post, I cover some cheap ways to soundproof a room for drums.
Soundproofing a room can be an expensive process. It requires specific materials that are designed to eliminate sound from traveling through an area. However, if you’re looking for a few quick, cost-effective ways to reduce the amount of sound from a room, you can start with these steps.
Table of Contents
First things first…and it’s free

If you’re having concerns with the noise levels disturbing your neighbors, then I would suggest you start by talking to them, explain your drum, tell them you’ll never play after 10 pm or so, and that if it bothers them to let you know and you’ll work something out or find a time they are not home. You should also check your City web page and looked up sound ordinances on there.
As I understand it, most cities should have at least a PDF of the law which details the different times of day and limitations on environmental sound levels. Keep in mind that Disturbing the Peace has no dB limit and can pretty much encompass anything.
Look for any gaps
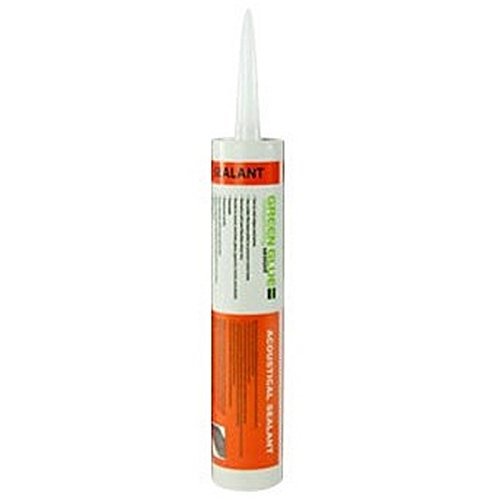
Your first step in reducing sound from escaping is plugging the gaps. Find all those holes and voids that sound travels through. Use a flashlight if it helps and goes through the room inch by inch. Use your hands to feel where the air is coming from. Once you find the gaps use green glue noise proofing sealant to seal them off.
Acoustic foam panels
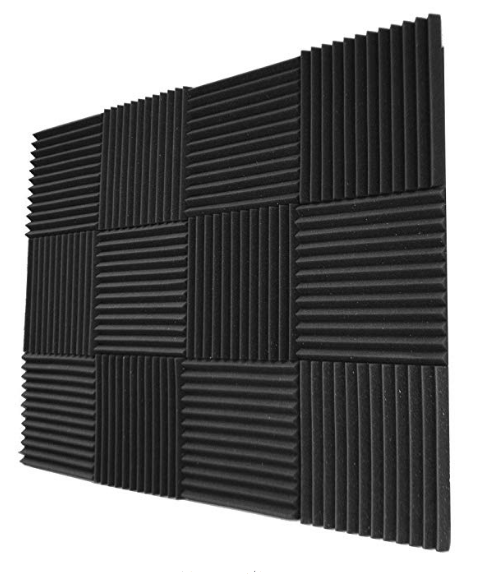
Acoustic foam panels are more effective at keeping the noise from going out through a wall than preventing noise from coming in through a wall.
These panels are primarily designed to absorb sound. If you want to use them effectively to block out sound, you will need to install them in the room that the noise is coming from.
If your neighbor is making noise, then these panels offer very little to you. If you plan to use these to block noise from coming in, then remember the wall can only be as effective at blocking out sound as its weakest point, meaning you will need to cover the wall entirely for any real benefits.
Imagine you’re using this method in your nursery. When your baby cries, the sound reflects off the flat hard surfaces in the room. This echo intensifies the sound, so it gets louder. Attaching foam panels to the walls (flat hard surfaces) prevents sound waves’ reflection, so the sound is reduced.
Mass Loaded Vinyl (MLV) applications
Mass is a critical component in sound control and works by simply stopping sound from vibrating through its structure. Mass Loaded Vinyl (MLV) is an effective material to use in lining soundproofing curtains or blankets.
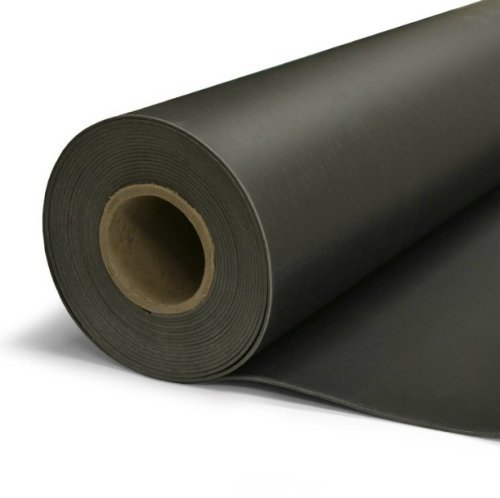
At even just ½LB per sq ft, MLV can produce a 25 STC rating, which is 1/16” thickness. You can get up to 35 STC by using 2lb per sq ft and 1/4” thickness; however, this is slightly more difficult to work with.
DIY Installation Guide for Mass Loaded Vinyl (MLV)
Setting Up for Success with MLV
When it comes to soundproofing, Mass Loaded Vinyl (MLV) is a heavyweight champion—literally. Whether you’re choosing Soundsulate or Peacemaker, the installation process is crucial to maximizing their sound-dampening powers. Don’t worry; as a DIY enthusiast, I’ll break it down so you can easily tackle this project with confidence.
Step-by-Step Installation: Walls and Ceilings
- Secure Framework: Start by ensuring you have a solid frame structure in place. This could be the existing studs in your walls or joists in your ceilings. For both Soundsulate 1 lb mass-loaded vinyl MLV and Peacemaker, a sturdy foundation is key.
- Roll Out the MLV: Measure the area you’re covering and cut your MLV accordingly. Remember, MLV is flexible but dense, so a sharp utility knife will be your best friend here.
- Fasten MLV: Affix the MLV directly to your walls or ceilings. You can use staples, nails, or even specialized MLV adhesive for a secure fit. For soundsulate sound absorbing acoustical drop ceiling tiles, ensure the MLV is cut to neatly fit each tile space.
- Seal the Seams: Use acoustic sealant along the edges of each MLV piece to ensure there are no gaps. Overlapping the edges by about an inch before sealing is a pro tip for superior sound blockage.
- Top with Drywall: Especially for interior applications, covering MLV with drywall not only protects it but also adds an extra layer of soundproofing. Plus, it keeps your space looking neat and ready for paint or wallpaper.
Floor and Pipe Applications
- Under Carpets: For floor applications, like placing MLV under the carpet, ensure the surface is clean and flat. Laying down MLV before the carpet pad and carpet enhances soundproofing from the ground up.
- Wrapping Pipes: To reduce noise from clanging pipes, wrap MLV around them, securing it with tape. This application is straightforward and significantly reduces sound transmission through plumbing.
Important Considerations
- Aesthetic Impact: While MLV can technically be used outside, it’s not recommended due to aesthetic reasons. Inside, hidden behind walls, floors, or ceilings, MLV works its magic unseen.
- Durability: MLV is built tough, but for floor applications where there’s direct foot traffic, it’s better protected under a carpet or flooring material.
Remember: Soundproofing works best when you address the noise source directly. MLV’s effectiveness shines when strategically placed between you and the noise. With its mass, MLV makes a considerable difference in reducing sound travel—making your home or workspace a haven of peace.
By following these steps and keeping the key considerations in mind, installing Soundsulate or Peacemaker MLV can be a rewarding weekend project. Not only will you enhance your living space’s comfort, but you’ll also gain the satisfaction of having tackled the job yourself.
Seal cracks and gaps around the frame
Air and sound may also leak through gaps around the frame, so sealing off this area is another “Must-do” step in the sound management process.
Caulking in a layer of Green-glue around the frame will effectively address this issue. A large caulking gun is needed, and applying to bead around the entire frame is recommended.
Once you have established an air-tight seal around the frame and there are no gaps around the frame itself, you can look at other areas to address.
Sound sealing or weatherproofing for an air-tight seal
Airgaps need to be treated to ensure complete coverage and manage sound seeping in through the frame. It would be best if you did this on both sides and at the top of the frame. Weatherstripping requires little effort but, done properly; it’s an effective sound management method.
Most products use a peel-and-stick function. Surface preparation is required as the glue needs a clean area to ensure adhesion. An alcohol wash is not always required but is recommended. Installation should be done on the inner part of the frame.
You can use two methods for this:
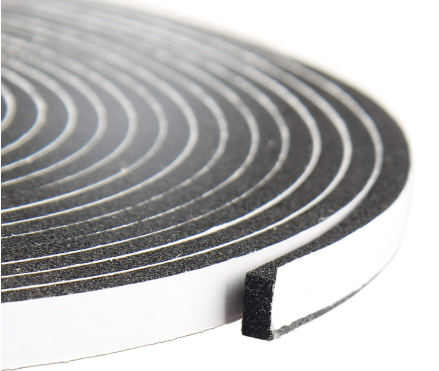
Acoustic gasket
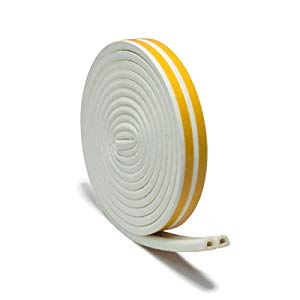
This is a foam rubber composite material that is a hollow “D” shape. When compressed, the gasket seals off and prevents airflow. If the gap is wide enough, you may end up with an air pocket which is just as effective as a soundproofing method.
Peel off the protective strip to expose the sticky side of the tape and then stick the gasket to the frame on all the edges as required.
Closed-cell foam
Acoustic-treated foam is the most commonly used material for this. It is compressed between the inner door frame and the door itself, preventing sound from traveling through.
Again peel-and-stick methods are commonly utilized for the application, which makes it easy to install.
Read more about Soundproofing a wall.
The Drum Room Door
Installing a door sweep. It’s not only great to block out noise, but it also insulates the room better, which can save you on your heating bill. It’s also inexpensive and usually easy to fit in. There are also various types you can choose from as long as they are thick enough to block out the sound. The Super Sound Proofing Co. offers a specially modified draft door sweep to block sound from coming under the door bottom.
Their soundproofing seal is a metal strip, and rubber loop sealed ends for added performance in creating a dead air space within the loop. Usually, only a screwdriver and a few minutes are needed to install unless you have a metal that will need pilot holes drilled in for the screws.
Installing a door sweep
- Apply to a clean, dry surface.
- Peel protective backing from starting end of the roll.
- Locate and press the end of the tape in place.
- Working the length of tape, press in place as you continue to remove protective backing.
- As you approach the desired length, cut to fit before removing all the protective backing.
Soundproofing curtains
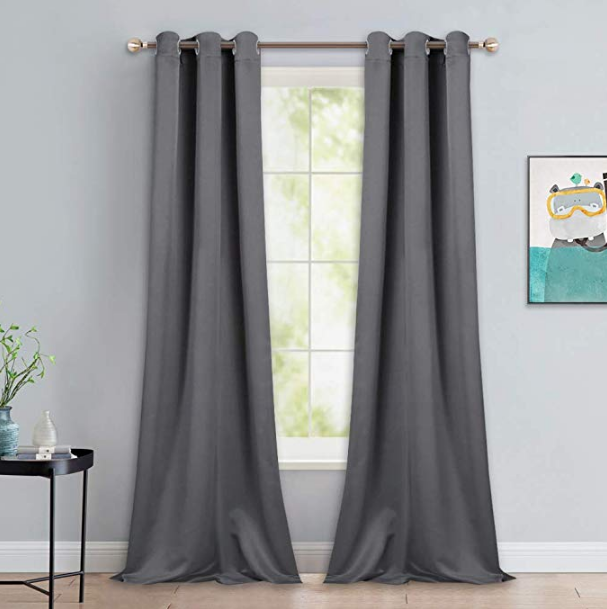
These curtains can boast up to 20 STC ratings, about as much as a hollow-core door can produce by itself. However, this is only in the presence of an MLV or similar lining. Most curtains advertised as “Soundproof” curtains are merely light blocking, but they have limited effectiveness in blocking sound. Done right with the proper soundproof curtains will result in a noticeable difference in the amount of sound coming into an area. Even at a 10 STC rating, it will sound like half the noise as before.
Using soundproof curtains specifically designed to block out sound vibrations can be a useful option when you have mild sound issues. They can also use it in combination with your other efforts employed to enhance effectiveness.
You will need to install a curtain rail and aim for a 4″ overlapping width and height. You’ll also want to have the curtain hanging as flush to the wall as possible. This will avoid sound leaking out from behind the curtain.
Windows are one of the main places where noise can get in or out of a room. Your walls might be doing a good job blocking noise because they’re thick. But regular glass windows aren’t as thick, so noise can easily sneak through them. If you’re looking for ways on how to soundproof windows yourself without giving up the ability to use them, it can be a bit of a challenge. But with the right approach, you can keep the noise out without losing the benefits of your windows.
Sound treating a window helps reduce distracting noise from coming through. You’ll want to seal off any gaps that may be around the frame. You will also need to consider covering the window with a soundproofing material within the frame or outside the frame. This gives the window density and also implements a sound treatment strategy. The air gap formed through these inserts diffuses sound waves and thus reduces sound travel. In some cases replacing the window altogether with an acoustic-treated window is required.
You’ll want to cover the window with a soundproofing material within the frame or on the outside of the frame.
If you have an existing window facing a noisy area, you will have faced issues with the sound coming in through that existing window. It could be traffic & highway noise, neighbors, barking dogs, HVAC, other machinery, etc.
Here are some methods you can do yourself with little to no DIY skills that I’ve found online.
How to Soundproof Windows Yourself – First things first – “Must do’s.”
Your first step in reducing unwanted sound from entering through your existing windows is plugging the gaps.
Sealing the smallest crack will make a big difference. If the windows are not closing properly, you should deal with that first.
Sound vibration travels through air, and a 1% air gap can allow 30% of the sound to travel through. Find all those holes and voids that sound is traveling through and seal them up.
Sound sealing or weatherproofing for an air-tight seal
Airgaps need to be treated to ensure complete coverage and manage sound seeping in through the frame. It would be best if you did this on both sides and at the top of the frame. Weatherstripping requires little effort but, done properly; it’s an effective sound management method.
Most products use a peel-and-stick function. Surface preparation is required as the glue needs a clean area to ensure adhesion. An alcohol wash is not always required but is recommended. Installation should be done on the inner part of the frame.
You can use two methods for this:
Acoustic gasket
This is a foam rubber composite material that is a hollow “D” shape. When compressed, the gasket seals off and prevents airflow. If the gap is wide enough, you may end up with an air pocket which is just as effective as a soundproofing method.
Peel off the protective strip to expose the sticky side of the tape and then stick the gasket to the frame on all the edges as required.
Closed-cell foam
Acoustic-treated foam is the most commonly used material for this. It is compressed between the inner door frame and the door itself, preventing sound from traveling through.
Again peel-and-stick methods are commonly utilized for the application, which makes it easy to install.
Seal cracks and gaps around the frame
Air and sound may also leak through gaps around the frame, so sealing off this area is another “Must-do” step in the sound management process.
Caulking in a layer of Green-glue around the frame will effectively address this issue. A large caulking gun is needed, and applying to bead around the entire frame is recommended.
Once you have established an air-tight seal around the frame and there are no gaps around the frame itself, you can look at other areas to address.
5 DIY methods to consider
National Consumer Center offers you a chance to get a $500 gift card to Amazon. The payouts are quick, and you can use the Gift Card to pay for some of your Amazon products.
Window barrier blanket (Sound blankets for windows)
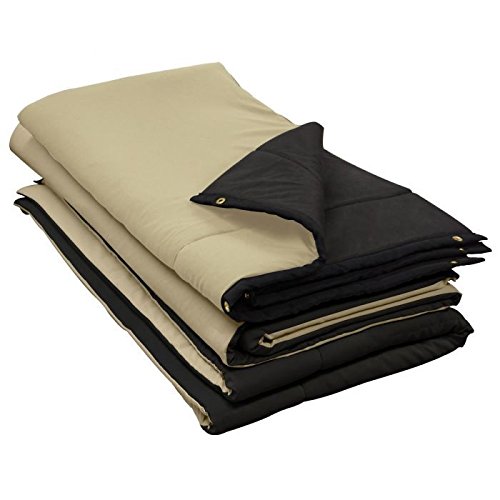
This option is very similar to the window cover in installation; however, the material is different.
A quilted blanket is used to block out the sound effects. Most options have grommets to hang above a window easily. With Audimute, you can expect a noticeable improvement in the sound quality of your room due to reduced sound echoes and reverberation.
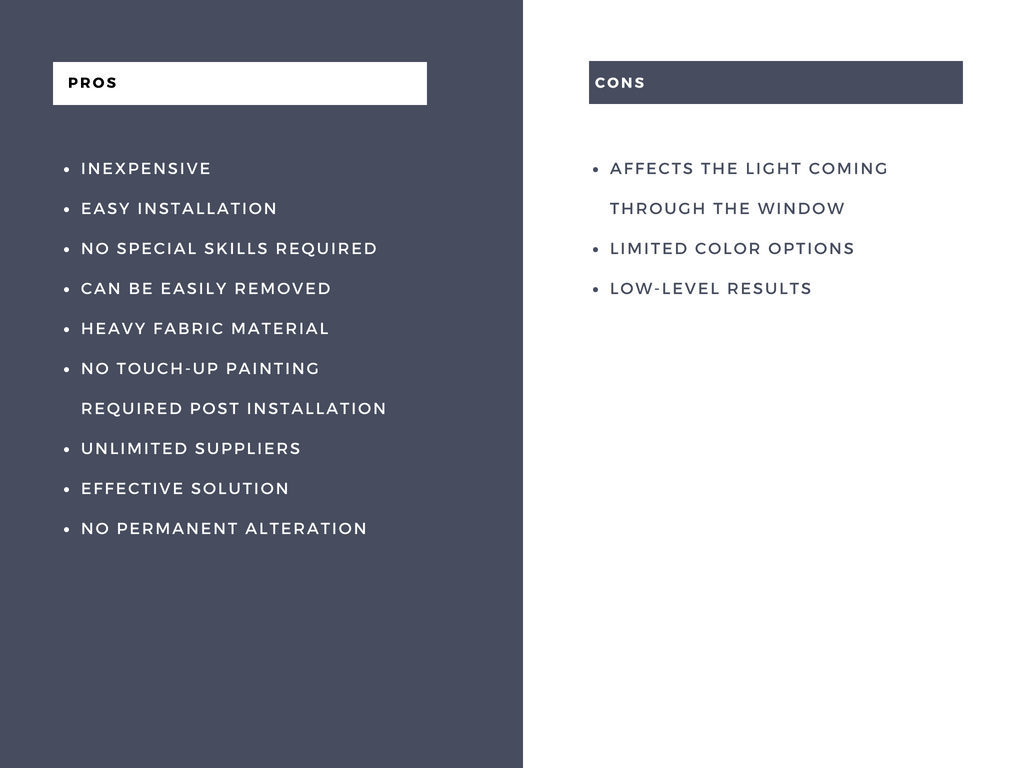
Pros and Cons of Audimute Window Barrier
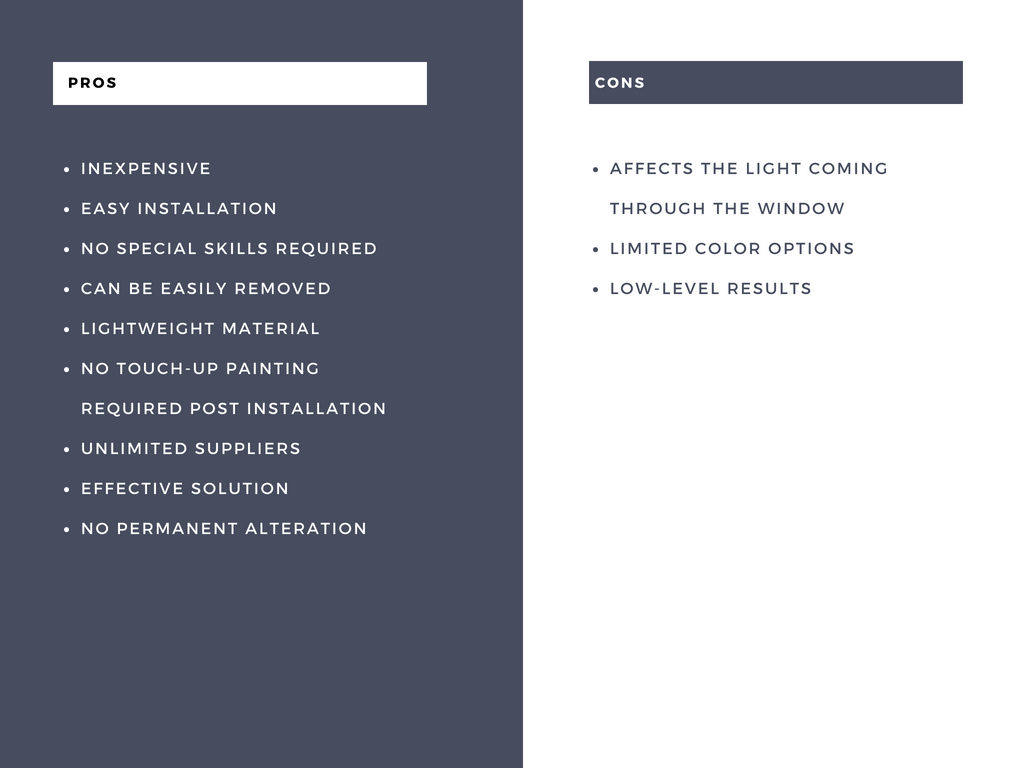
Where to begin
This option will affect the light coming through the existing windows. Very easy to install without requiring any special skills. It is also easily removed and requires no heavy lifting. The results, unfortunately, are not as great; however, depending on your needs, this may be an effective measure. The installation is not permanent and is very cost-effective.
Soundproofing curtains
These curtains can boast up to 20 STC ratings, about as much as a hollow-core door can produce by itself. However, this is only in the presence of an MLV or similar lining. Most curtains advertised as “Soundproof” curtains are merely light blocking, but they have limited effectiveness in blocking sound. Done right with the proper soundproof curtains will result in a noticeable difference in the amount of sound coming into an area. Even at a 10 STC rating, it will sound like half the noise as before.
Using soundproof curtains specifically designed to block out sound vibrations can be a useful option when you have mild sound issues. They can also use it in combination with your other efforts employed to enhance effectiveness.
You will need to install a curtain rail and aim for a 4″ overlapping width and height. You’ll also want to have the curtain hanging as flush to the wall as possible. This will avoid sound leaking out from behind the curtain.
Pros and Cons of Soundproof Curtains
Installation of these curtains is simple when using the already fitted grommets. You can easily remove the curtains, and no permanent effects are left. Although the results are not great, you can use this in conjunction with any other method to improve the overall effectiveness. The cost is also relatively low for a 57″ X 84″ curtain. You can find them here on Amazon. They weigh between 4lbs to 7lbs, depending on the length.
Where to begin
Once you’ve bought the right size curtain for the existing windows, you want to cover, replace your current curtain with it. If you’re using a different method to hang your curtains, you’ll need to install a curtain rod to thread the grommets onto.
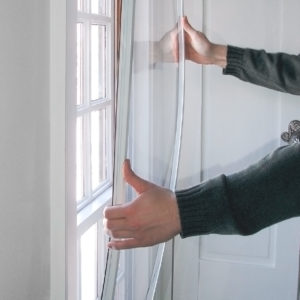
Window sound barrier panel
This comes in both a clear and opaque option that velcro sticks to your window’s outer frame. The clear option allows light to enter the room and still provides an equal amount of sound blocking.
Pros and Cons of Window Barrier
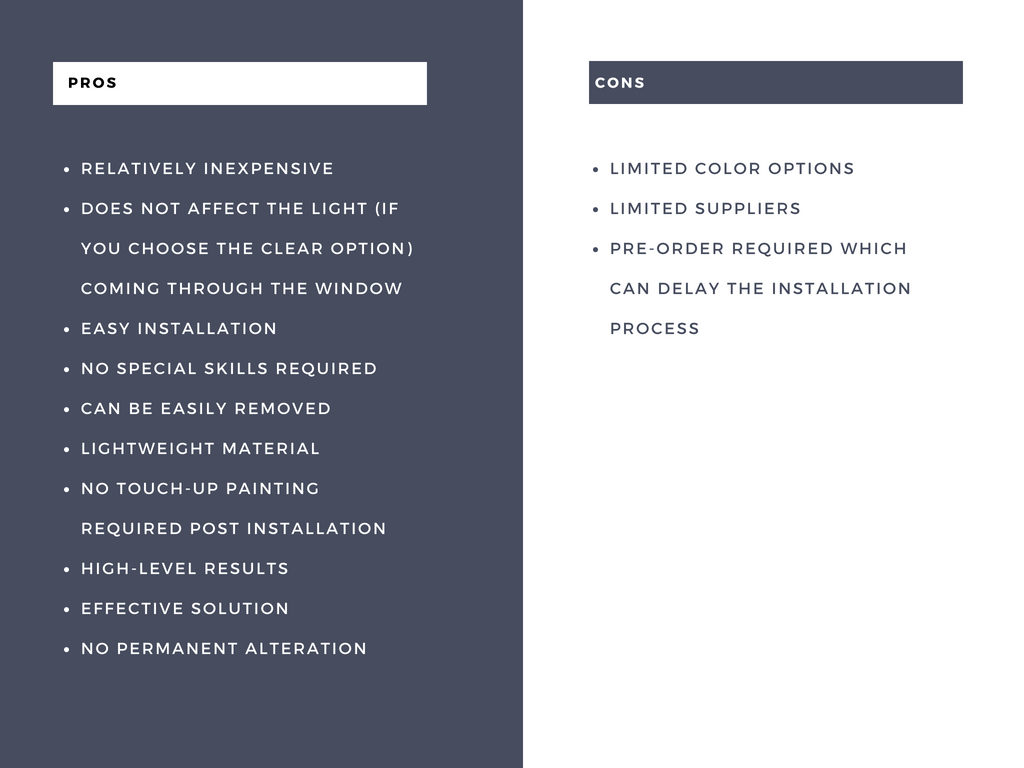
Pros and cons of a window sound barrier
It’s not very difficult to install, doesn’t require any special skills, and can be removed. Also, it doesn’t require any heavy lifting, and you won’t have to touch up the painting when you’re done. The results are typically between 7 – 15 significant dB reduction, making this method highly effective. Trademark Soundproofing offers a 48″ X 48″ panel for around $300.
Where to begin
You need to measure the required size of the panel, which should be 2″ greater than the window itself (this is where you will place the velcro strip), and order the panel.
Once you’ve selected the color, width and height required. This will determine your final price. See the video above for detailed how-to order instructions. Note that you will need at least 2″ on all sides to accommodate the velcro. Be sure to include that measurement in the final size you choose from the drop-down menu.
Using a Window Soundproofing Sealing Kit
A window soundproofing sealing kit is like a second window that sits in or against your existing window frame. It also uses a thermal and acoustic abatement material and can reduce 80% of sound traveling in and out of a room.
Pros and Cons Using a Window Soundproofing Sealing Kit
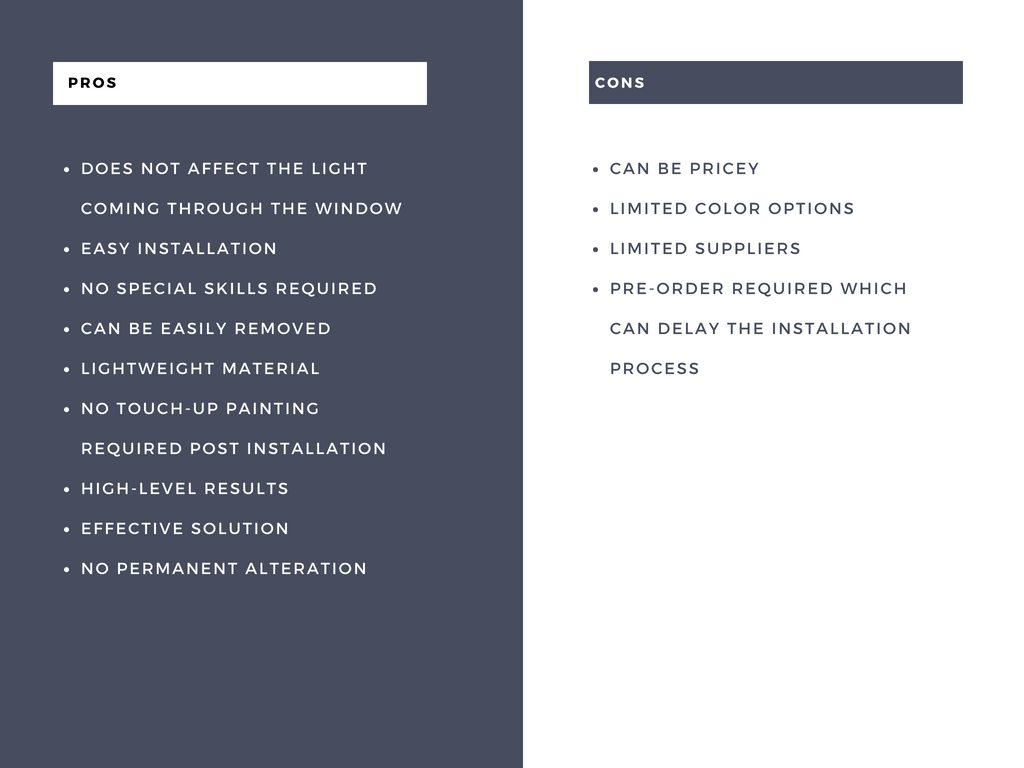
PrivacyShield® offers a tailor-made kit that you can easily install. For a 48″ X 48″ kit, you’ll be paying around $400. You can find the materials needed for installation at your local hardware store if you don’t have them already. No special tools are necessary either. You could do the job by yourself, but it wouldn’t hurt to have someone lend a helping hand.
Where to begin
The first thing you have to do is pre-order the kit tailor-made according to the measurements of your existing windows. They also have a detailed instruction manual to help you through the whole process.
Conclusion to How to Soundproof Windows Yourself
In conclusion, soundproofing your windows doesn’t have to break the bank. With options ranging from $40 to $400, you can find a solution that fits your budget and needs. The effectiveness of these methods varies, but investing in higher-quality products can offer better sound reduction and durability. Take the initiative to enhance the comfort of your home by tackling this project yourself. It’s an investment in your peace and tranquility.
Ready to make your home a quieter place? Start by choosing one of the soundproofing methods outlined above and see the difference it can make. Don’t wait to improve your living environment. Take action now and enjoy a more serene home today.
Soundproofing your home
Ready to transform your living space into a sanctuary of peace and quiet? Dive into our essential guide to soundproofing your home! From selecting the right materials to easy DIY installation tips, we’ve got everything you need to block out unwanted noise and create the tranquil environment you’ve always dreamed of.
Find out more about soundproofing your home’s windows, doors, ceilings, and floors. Don’t let the buzz of the outside world disrupt your peace. Start your soundproofing journey today and enjoy the serene, noise-free home you deserve. Click here to unlock the secrets to a quieter home!
If you are interested in simply changing to soundproof windows, you can see my blog on these windows. This would require you to replace your current windows completely.
Good luck and happy soundproofing!
If the entrance is your main concern, you should consider an additional measure, and a soundproofing cover for your door is quick and relatively cost-effective. Singer Safety double-faced quilted fiberglass panel with grommets. Constructed of two layers of QFM bound back-to-back. Estimated noise reduction: up to 17 DBA. Panels have bound hems; nickel-plated brass grommets 12-inches o.c. along the top and double grommets 18-inches o.c. alongside edges for fastening to adjacent panels. Double-faced material in nominal 2-inches thickness, for use as an absorber. Measures 4-feet width by 6-feet height by 2-inches thickness.
Read more about Door Soundproofing
National Consumer Center offers you a chance to get a $500 gift card to Amazon. The payouts are quick, and you can use the Gift Card to pay for some of your Amazon products.
A simple Drum Rug or Roland Noise Eater?
To eliminate any vibration, you should add a drum rug. This can be a one-inch foam rubber mat that your kit sits on. You can also place a rug over that. Meinl Cymbals has a good drum rug.
For the best results, you should definitely consider the Roland NE-10 Noise Eater.
It is a unique sound isolation board designed specifically for V-Drums kick pads/pedals and hi-hat control pedals. Thanks to its multiple dome-shaped rubber dampers, placing the NE-10 under a pedal/pad dramatically reduces the transfer of noises and vibrations through the floor caused by normal playing. This allows users in multi-level buildings to enjoy V-Drums freely without disturbing people occupying rooms or dwellings below. The NE-10 Noise Eater is straightforward and convenient to use, with a compact, low-profile design that doesn’t affect feel or playability.
Alternate your kit setup
Remo Silentstroke – Drum setup
If you’re recording, you may have no choice in the matter, but if you’re practicing, you may need to consider changing your set to a quieter one by adding Remo Silentstroke.
Zildjian Low 80 – Drum setup
https://offer.alibaba.com/cps/gu5eh153?bm=cpsu0026src=safu0026productId=1600170539765
Zildjian Low 80. These kits will give you the freedom to go hard without having to worry too much about disturbing the peace.
Install a Phone Booth
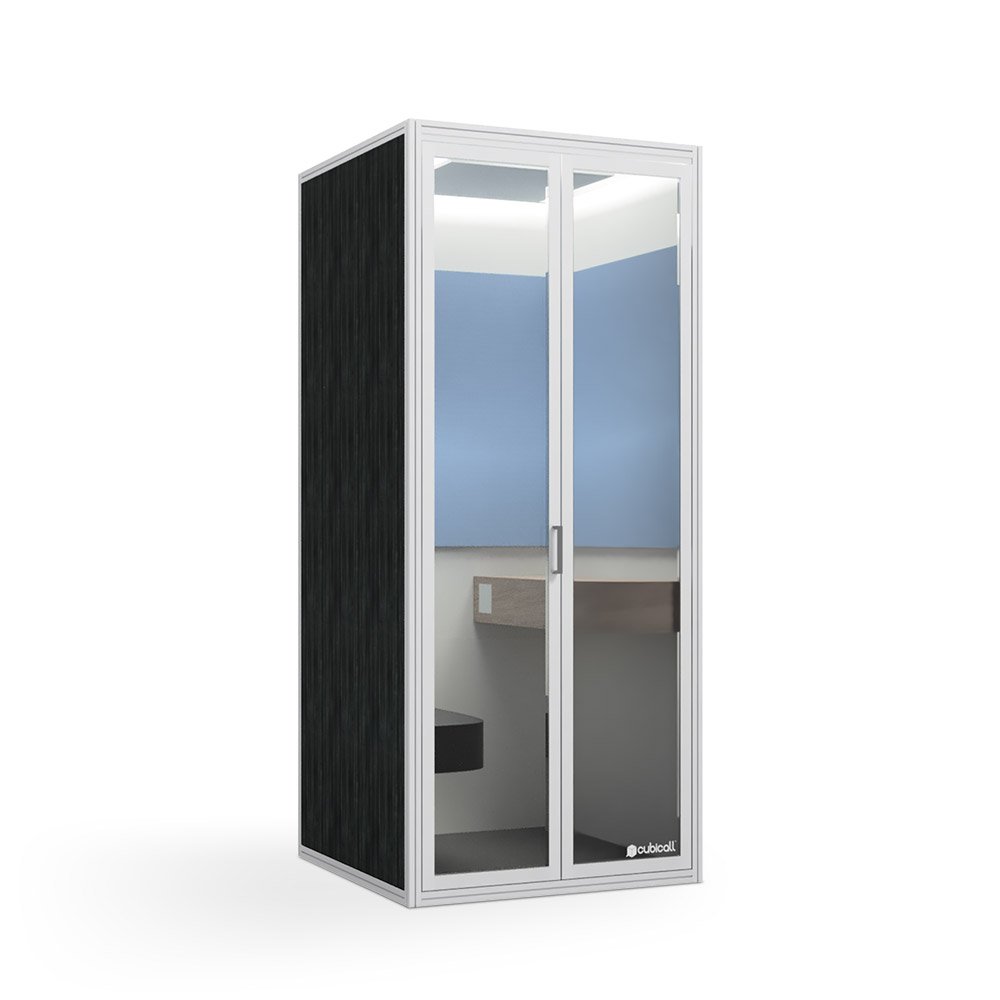
Cubicall was made to give its occupants privacy. Therefore, it’s designed the phone booth to give an acoustically sound experience. The walls are built with acoustic fill that absorbs a wide range of sound frequencies. The interior of the call booth is finished with acoustic panels, which help absorb sound and delivers a modern, elegant look. The bi-folding doors utilize double pane glass that helps reduce noise bi-directionally.
The modular design ships flat and is easily assembled within one hour. These booths utilize an innovative locking wall assembly that requires minimal tools and creates a robust structure.
Whether you’re using an IP phone, cell phone, a favorite communication app, or need a quiet space to focus, Cubicall modern phone booths bring privacy and productivity back to the office or home.
Conclusion
In conclusion, soundproofing your drum room will take some effort but doing it this way is considerably cheaper than the trouble you may find yourself in for disturbing the peace.
Good luck and happy soundproofing!