
Van floor sound deadening works best when each layer has a specific job. A damping mat can calm resonant sheet metal, a dense barrier can help reduce airborne road noise, an underlayment can separate rigid layers, and the subfloor provides the structural base for the finished interior.
The mistake is treating all of those materials as interchangeable “soundproofing.” They are not. In a campervan or RV, every extra layer also costs weight, floor height and installation complexity, so the best floor is usually the simplest assembly that addresses the noise paths you actually have.
SPD’s approach is therefore to diagnose first and layer second. If the metal floor is ringing, use damping where it is useful. If tire and road noise are still coming through the floor, consider whether added mass is worth the payload penalty. Then build a stable, moisture-conscious floor above it without compromising service access or structural mounting points.
What causes noise through a van floor?
A van floor is exposed to several types of noise at the same time, which is why one material rarely solves the whole problem.
- Sheet-metal resonance: large sections of relatively thin vehicle bodywork can vibrate when excited by the road, tires or drivetrain.
- Airborne road and tire noise: sound generated beneath the vehicle can enter through the floor, wheel wells, seams and openings.
- Structure-borne vibration: tires, suspension and drivetrain components can transmit vibration through the body itself.
- Weak points: wheel wells, access openings, poorly sealed penetrations and thin local sections can dominate even when the center of the floor is heavily treated.
That distinction matters. A butyl damping mat can reduce panel resonance, but it is not the same thing as a heavy sound barrier. A soft underlayment can reduce contact between hard layers, but it does not automatically block low-frequency road noise.
If you are treating the whole vehicle rather than just the floor, our Ultimate Guide to Van Insulation and Soundproofing covers the wider walls, roof, doors, insulation and acoustic system.
If you are still deciding which material belongs in each part of the vehicle, our RV soundproofing materials guide compares damping mat, cavity insulation, decoupling layers, dense barriers and seals by function.
Van floor sound deadening: what each layer does
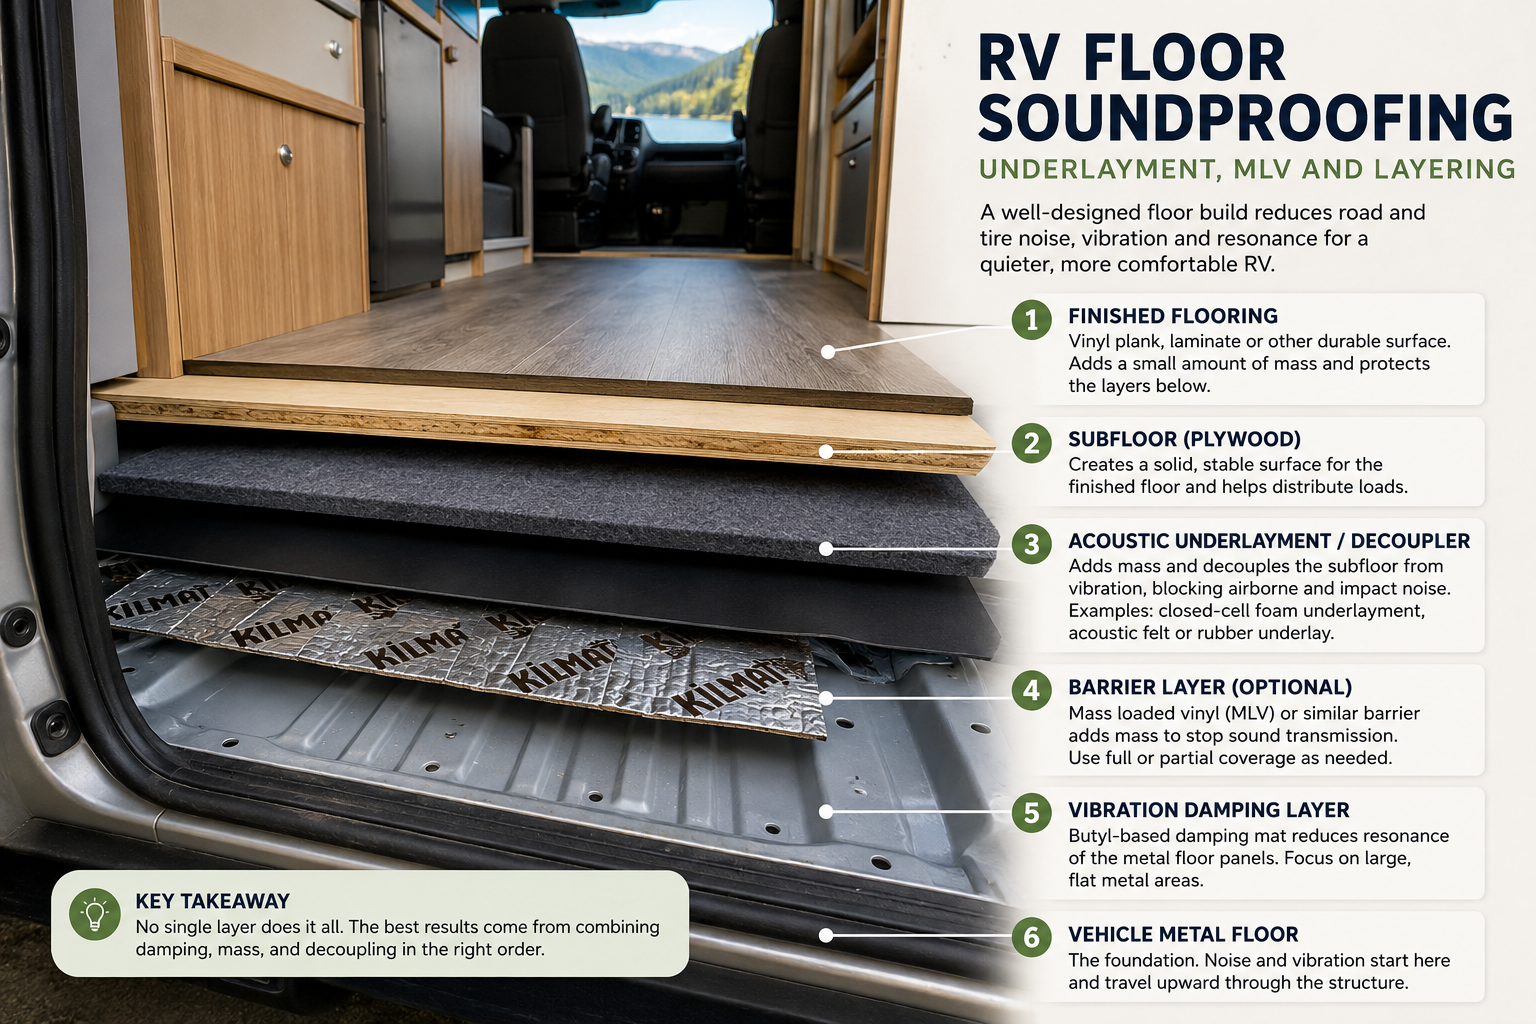
The diagram shows a useful way to think about the floor, but it is not a rule that every van needs every layer.
A possible build from the metal upward is:
- Vehicle metal floor
- Selective vibration-damping material
- Optional dense sound barrier such as MLV
- Acoustic underlayment or decoupling layer
- Structural plywood or another suitable subfloor
- Finished flooring
A lightweight weekend camper may reasonably use fewer layers. A larger conversion where road noise is a major priority may justify more. What matters is understanding why each material is there.
1. Start with the bare metal floor
Good van floor sound deadening starts before the first acoustic product is installed.
Remove enough of the existing flooring to inspect the vehicle floor properly. Clean away dirt, oils and loose material, and deal with corrosion, leaks or damaged seams before covering the metal.
Also identify anything that must remain accessible, including:
- seat and seat-belt mounting points;
- service covers;
- wiring routes;
- drainage points;
- factory fasteners;
- removable access panels.
Acoustic treatment should never compromise a structural attachment or hide a problem that should have been repaired first.
2. Use damping mat where the metal resonates
Butyl-based constrained-layer damping material is primarily a vibration-control layer.
When a broad metal panel flexes and rings, the damping layer reduces that vibration and can make the panel less efficient at radiating noise into the cabin.
That does not mean every square inch of the floor automatically needs to be covered.
SPD would concentrate first on the larger, relatively flat panels that actually resonate. Structural ribs, heavily formed sections and already-stiff areas may offer less benefit from adding more damping material.
This selective approach matters in a van because acoustic materials quickly become part of the payload. More material is not automatically better if the additional weight is solving very little.
3. Pay particular attention to the wheel wells
The wheel wells can be among the most important road-noise areas in a van.
They sit close to the tires, receive considerable vibration and have curved metal surfaces that can radiate noise directly into the vehicle interior.
If the wheel-well panels resonate, an appropriate damping treatment can help. Additional barrier or insulation treatment may also be useful where the construction allows it.
Do not focus so heavily on the flat center of the floor that these stronger transmission paths remain untreated.
4. Decide whether you actually need MLV
Mass-loaded vinyl, or MLV, is a dense flexible barrier. Its job is fundamentally different from damping mat: instead of primarily controlling the vibration of the metal panel itself, added mass can help resist airborne sound transmission through an assembly.
That makes MLV potentially useful for road and tire noise, but it comes with important compromises in a vehicle.
- MLV is heavy.
- It adds another layer to the floor stack.
- It can complicate installation around ribs, curves and mounting points.
- Gaps and poorly planned penetrations can weaken the benefit of a barrier layer.
- The additional mass has to be considered alongside passengers, water, batteries, cabinetry and the rest of the conversion.
SPD would therefore treat MLV as optional rather than automatic.
If panel resonance is the main issue, damping may be the more direct treatment. If substantial airborne road noise is still passing through the floor and the vehicle can safely carry the additional mass, a properly integrated barrier becomes more attractive.
For a broader comparison of barrier and damping materials beyond the floor itself, see our Soundproofing Materials for RVs guide.
5. What acoustic underlayment does
An acoustic underlayment can sit between harder layers of the van floor and provide some degree of separation or cushioning.
Depending on the specific material, an underlayment may help with:
- reducing direct hard-to-hard contact;
- limiting some vibration transfer between layers;
- softening impact and footfall noise;
- protecting or separating a dense barrier layer;
- providing limited additional thermal insulation.
Closed-cell foam is often attractive in vehicle construction because it can provide separation without behaving like a thick open fibrous material beneath the floor. Rubber and purpose-designed acoustic underlayments can also be useful when their compression characteristics, moisture resistance and flooring compatibility suit the build.
Do not choose an underlayment simply because it is the thickest or softest option available. The structural floor above still needs proper support.
6. Build a stable structural subfloor
The subfloor is primarily a structural component, even when it contributes some additional mass to the acoustic assembly.
It must support cabinetry, furniture, foot traffic and the final flooring while remaining compatible with the vehicle layout.
Depending on the conversion, plywood or another appropriate structural sheet material may be fitted above the acoustic layers.
The goal is a solid floor without avoidable rattles, loose panels or badly compressed soft layers underneath.
Before fixing the subfloor permanently, verify:
- door and step clearances;
- seat and furniture mounting locations;
- service access;
- finished floor height;
- safe fastener locations;
- any manufacturer requirements that must remain accessible.
7. The finished floor is not the main sound barrier
Vinyl plank, engineered flooring, laminate, carpet and other interior finishes can all affect how the space feels and sounds, but they should not be expected to do the heavy acoustic work underneath the van.
Carpet can reduce some interior reflections and soften footfall noise. A hard finish may be easier to clean and maintain. Neither should be confused with the main treatment for tire and road noise entering through the vehicle body.
The more important acoustic decisions happen below the finished surface.
Three practical van floor builds
Lightweight sound-deadening floor
A weight-conscious campervan could use:
- selective damping on resonant metal;
- a thin suitable decoupling or underlayment layer;
- a structural subfloor;
- finished flooring.
This approach targets panel vibration without automatically adding a heavy barrier across the entire floor.
Balanced road-noise floor
Where road noise is more important and payload allows it, a more substantial system could use:
- selective vibration damping;
- a planned dense barrier where justified;
- an appropriate decoupling or acoustic underlayment;
- structural subfloor;
- finished flooring.
The floor height and added mass should be calculated before committing to this type of build.
Maximum noise-control build
A larger RV or conversion where noise reduction takes priority over minimum weight may justify more extensive floor treatment.
Even then, SPD would not assume that maximum material coverage automatically produces maximum improvement.
If the dominant remaining paths are the doors, wheel wells, firewall, windows or body cavities, adding another layer to the center of the floor may produce diminishing returns.
How to install van floor sound deadening
- Remove the existing floor carefully. Preserve any hardware and note where structural mounting points are located.
- Inspect the vehicle body. Correct corrosion, leaks, loose seams and damage before covering the floor.
- Clean the metal. Adhesive-backed damping products need a suitably prepared surface.
- Identify resonant panels. Prioritize the sections that actually flex and ring rather than assuming blanket coverage is mandatory.
- Install damping where needed. Roll or press the material correctly according to its installation requirements.
- Plan any barrier layer. If using MLV or another dense barrier, account for seams, penetrations, access points and added weight.
- Add the chosen underlayment or decoupling layer. Keep the floor stable and avoid unsupported soft spots.
- Fit the structural subfloor. Maintain safe mounting points and required access.
- Install the finished flooring. Follow the flooring manufacturer’s requirements for expansion and fastening.
- Road-test the vehicle. Listen for the dominant remaining noise paths before deciding whether additional treatment is worthwhile.
Common van floor sound-deadening mistakes
Using damping mat as if it were a complete sound barrier
Damping mat is excellent at the job it is designed for: reducing vibration in resonant panels.
It should not be presented as equivalent to adding a substantial acoustic barrier.
Covering everything simply because more material fits
A van conversion has a real weight budget. Acoustic treatment competes with batteries, water, cabinetry, appliances, passengers and cargo.
Use enough material to solve the problem rather than treating maximum coverage as the objective.
Adding MLV without considering payload
A dense barrier may be acoustically useful but mechanically inconvenient. The total vehicle weight matters more than winning an argument about which soundproofing material is theoretically strongest.
Ignoring the finished floor height
Damping, barrier material, underlayment, plywood and the final floor can create a surprisingly deep stack.
Measure the complete assembly against door clearances, furniture, steps and standing height before installation begins.
Creating a moisture trap
Vehicle floors face leaks, condensation, wet footwear and changing temperatures.
Do not bury untreated corrosion or build an assembly that makes future water problems impossible to detect.
Ignoring the actual noise path
If most of the noise is coming through the wheel wells, doors or firewall, adding more material to an already well-treated floor may do very little.
This is why diagnosis comes before layering.
Is sound deadening worth installing under a van floor?
Usually, yes—when the treatment is matched to the problem.
A resonant bare van floor can benefit from damping. A floor that is a major path for tire and road noise may justify additional acoustic layers. A conversion that already has a stiff, heavily built floor may gain less from simply adding more products.
The value also depends on what the rest of the vehicle looks like acoustically. A sophisticated floor treatment cannot compensate for untreated doors, thin wheel wells and obvious gaps elsewhere.
SPD’s approach to van floor sound deadening
SPD would not begin with a shopping list.
Start by deciding what you are hearing.
If the floor panels themselves resonate, damping is the logical first tool. If airborne road and tire noise remains strong, consider whether a dense barrier is justified. If rigid layers are mechanically coupled, a suitable underlayment or decoupling layer can help. Then build the structural floor safely above the acoustic treatment.
Damping, mass and decoupling solve different problems. A good van floor uses the combination the vehicle needs rather than the maximum number of materials you can fit underneath it.
Frequently asked questions
What is the best material for van floor sound deadening?
There is no single best material because the floor can have more than one noise problem. Butyl damping material is useful for resonant metal, a dense barrier such as MLV can help with airborne noise where its weight is justified, and acoustic underlayment can provide separation between parts of the floor assembly.
Should I cover the entire van floor with sound-deadening mat?
Not automatically. Large resonant panels are normally the priority. Heavily formed or structurally stiff sections may benefit less from additional damping, and unnecessary coverage adds cost and weight.
Should I put MLV on a van floor?
MLV can be useful when airborne road noise through the floor is significant enough to justify the extra mass. It is not a mandatory layer in every campervan build.
What should go over sound-deadening mat in a van?
That depends on the floor design. A build may include an acoustic underlayment or decoupling layer, an optional dense barrier, a structural subfloor and then the finished flooring. The damping mat itself is normally only one part of the complete system.
Does foam stop road noise through a van floor?
Foam can provide useful separation, thermal insulation or absorption depending on its type, but lightweight foam should not be treated as equivalent to a dense barrier against road noise. Its role depends on the complete assembly.
Are wheel wells more important than the main van floor?
They can be. Wheel wells sit very close to the tires and can be strong paths for vibration and road noise. They should be assessed alongside the flat floor panels rather than treated as an afterthought.
Will floor sound deadening make a campervan quiet?
It can reduce an important part of the noise problem, but a van contains many other transmission paths. Doors, windows, wheel wells, the firewall, roof and body cavities can all limit the final result.
Good luck and happy soundproofing!