Looking to enhance your driving experience with superior sound quality and comfort? Sound deadening materials like Noico and FatMat provide an ideal solution, significantly reducing unwanted road noise and vibrations. In this comprehensive guide, we dive into the benefits and installation processes of these top-tier sound deadening materials, and help you decide which is best for your vehicle.
Table of Contents
Head-to-Head: Noico vs. FatMat Sound Deadening
When it comes to choosing the right sound deadening material for your car, the details matter. Noico and FatMat are both leaders in the market, but they have some differences that might sway your decision. Let’s compare their features:
- Material Quality: Noico uses a thick butyl-based material that excels in eliminating road noise. FatMat, on the other hand, combines rubber and aluminum to offer both sound deadening and heat resistance.
- Installation: Noico boasts an easy-to-use installation indicator that helps ensure a proper application, while FatMat is known for its user-friendly adhesive that sticks firmly with minimal effort.
- Product Range: Noico offers a variety of thicknesses to suit different noise canceling needs, whereas FatMat provides options like the Rattletrap and Mega Mat for different levels of soundproofing and insulation.
- Cost-Effectiveness: Both brands provide competitive pricing, but Noico often stands out for those on a tighter budget due to its balance of quality and affordability.
Ultimately, the best choice will depend on your specific needs, the areas of your car you’re looking to insulate, and your personal preference for material and installation ease.
| Noico vs FatMat | |||
|---|---|---|---|
| Sound Deadening | |||
| Both of these materials have no chemical smell, are multi-purpose use and reduce vibration. The basic composition includes an acoustic foam layer on top of the standard butyl & foil design. | |||
| Noico Pros | FatMat Pros | Noico Cons | FatMat Cons |
|
– Reduces noise and vibration – Installation indicator – Pre-cut sections – Cost-effective |
– Special rubber and aluminum combo – Can be used under carpet – Easy installation – Strong adhesive backing |
– May require additional layers – Adhesion difficulties reported |
– Thickness may be challenging – Adds weight to the vehicle |

Sound Deadening Materials: A Comparative Overview
In the realm of automotive customization, the use of sound deadening materials has become a cornerstone for enhancing vehicle audio and reducing unwanted noise. Two standout products in this category are Noico and FatMat, each promising to transform your driving experience into one of tranquility and acoustic clarity.
Noico boasts a variety of thicknesses, including their renowned 80 mil mats, complete with an installation indicator for optimal placement. FatMat, alternatively, couples a rubber and aluminum concoction to create a formidable barrier against both sound and heat. These materials not only aid in achieving a quieter cabin but also work wonders in improving the overall sound quality of your in-car audio system.
When it comes to installation, both brands offer solutions that cater to the do-it-yourself enthusiast. Clean surfaces, precise measurements, and thorough application are the steps to a successful insulation upgrade. Although similar in function, the choice between Noico and FatMat will ultimately depend on personal preference, specific vehicle needs, and desired results.
For further insights and detailed product comparisons, feel free to explore the comprehensive reviews and customer testimonials available on their respective official websites and product pages.
Noico vs. FatMat – Which is the Superior Sound Deadener?
When it comes to reducing road noise and improving the sound quality in your vehicle, choosing the right sound-deadening material is crucial. Two popular options on the market are Noico and FatMat. Both have their advantages, but which one comes out on top?
| Noico Benefits | FatMat Benefits |
|---|---|
| Known for exceptional thickness and density, providing superior sound dampening capabilities. | Unique combination of rubber and aluminum, serving as both a sound deadener and a heat barrier. |
| Features an easy-to-follow installation indicator for correct application. | Praised for ease of installation and immediate noise reduction impact. |
| Flexible mats suitable for various contours of your vehicle. | Both products significantly reduce noise, enhancing the driving experience and audio quality. |
Final Verdict: Noico vs. FatMat
After comparing Noico and FatMat across several categories including material quality, ease of installation, effectiveness, and customer satisfaction, it’s clear that both brands offer significant benefits for sound deadening. Here are the final points to consider:
- Noico: Offers a great balance between price and performance, especially with its thicker mats that provide excellent sound absorption and vibration damping. Ideal for DIY enthusiasts due to its user-friendly installation process.
- FatMat: Stands out for its rubber and aluminum composition, providing not just sound deadening but also thermal insulation. It’s slightly more expensive but highly effective for those looking to also reduce heat inside the vehicle.
In conclusion, if your priority is straightforward installation and cost-effectiveness, Noico is an excellent choice. For those seeking additional thermal insulation alongside sound deadening, FatMat is worth the investment. Ultimately, both products will significantly enhance your driving experience by making your vehicle quieter and more comfortable.
Ready to make your choice? Visit the links below to purchase or learn more:

Installation Overview: Noico vs. FatMat
Installing sound-deadening materials in your car can transform your driving experience. Noico and FatMat are top contenders in the market, each with their unique installation procedures that ensure optimal soundproofing and vibration reduction. Here’s an overview of how to install these materials effectively.
Clean the application surface thoroughly
Measure and cut the sound deadening material
Apply the material to the car’s surface
Use a roller to smooth out the material
Inspect the installation for any air bubbles or loose edges
Test the sound quality and enjoy your quieter ride!
National Consumer Center offers you a chance to get a $500 gift card to Amazon. The payouts are quick, and you can use the Gift Card to pay for some of your Amazon products.
Noico Installation Steps
- Begin by thoroughly cleaning the surface where you plan to apply the Noico mat.
- Measure the area and cut the Noico mat to size before peeling off the backing to reveal the adhesive.
- Press the mat firmly onto the surface, using a roller to eliminate any air bubbles and ensure a secure bond.
- Repeat the process for all areas you wish to cover, ensuring you check the installation with Noico’s unique indicator.
FatMat Application Procedure
- Clean the application area and cut the FatMat to the required dimensions.
- Carefully peel back the release liner and apply the mat to the car’s surface.
- Use a roller to smooth out the material, ensuring full contact with the surface and no air pockets.
- Inspect the mat using any installation indicators provided to confirm a flawless application.
Post-Installation
- Inspection: Go over the entire area to ensure every piece is securely attached without any gaps or bubbles.
- Function Test: Once installed, test the sound quality inside your vehicle. You should notice a noise reduction immediately.
You should check your car’s manual first. For around $20, you can find a detailed version. The easiest way to find the hard copy repair manual for your vehicle is to select Repair Manuals by Make and Model. Or you can get an electronic version. They both have all sorts of instructions and guides, whether it’s for customization, maintenance, repair, or even simply just learning about the inner workings of a particular vehicle.
By following these steps, you can ensure a successful installation of your sound-deadening material, resulting in a quieter, more enjoyable driving experience. Remember, patience is critical during installation, as rushing can lead to mistakes that reduce the effectiveness of the sound deadening.
With these steps, you’re all set to upgrade your car’s soundproofing. For more detailed instructions, refer to the manufacturer’s guide or consult a professional installer to ensure the best results.
What to do next
I’ve detailed the application process for sound-deadening materials. If you’ve already decided on where you want to apply it see my comprehensive guidelines for
If you’re not sure where to start, I strongly recommend you begin with the doors. From there, you can move on to the trunk.
What you’ll need

A panel removal tool kit is required for the panel pins. This is because they avoid breakage of the pins during the removal of them. It’s also useful for prying away the panels without doing damage to your vehicle’s paint job.

Aluminum tape is also needed. You can patch up the parts where there might be gaps left or use the tape to give your application a clean finish.

Wear a good pair of workman’s gloves while working with the material. The foil edges are sharp and cut through your skin. The glue is also best avoided.

You can use metal shears instead of scissors for products like Dynamat and others. You can also use a switchblade.

Use the correct seam sealer (if required) to avoid it setting and causing ripples on your trunk lid. In addition, the seam sealer should maintain some flex when dries.
You may want to get a set of additional Bumper Retainer Clips, just in case you damage some or if you find a few missing already.

Use a portable light system to make it easier for you to see.
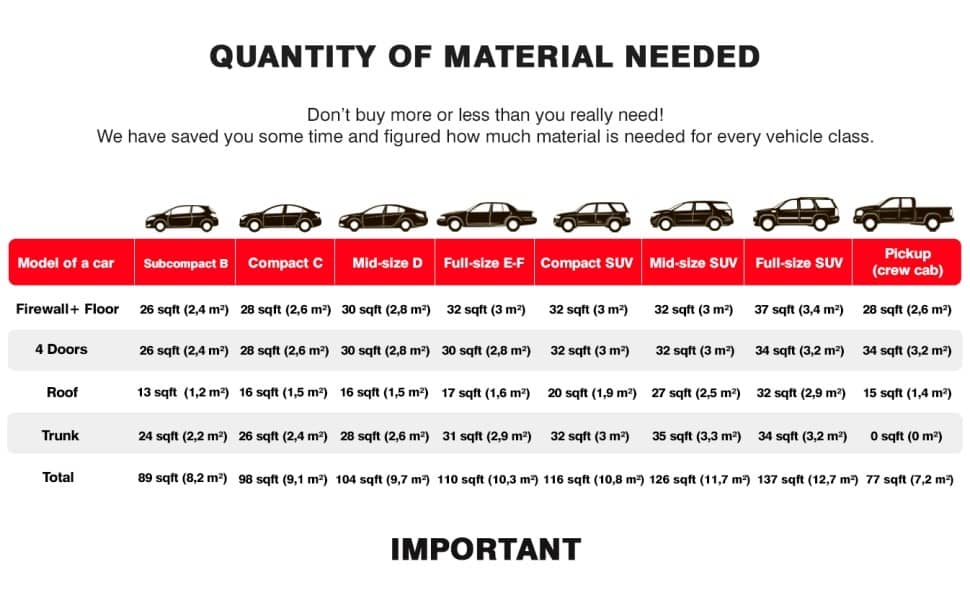
On these other blogs, I’ve provided a guide to purchasing the right pack size for whatever project you plan on undertaking. The step-by-step guide walks you through the process, including application.
You should check your car’s manual first. For around $20, you can find a detailed version. The easiest way to find the hard copy repair manual for your vehicle is to select Repair Manuals by Make and Model. Or you can get an electronic version. They both have all sorts of instructions and guides, whether it’s for customization, maintenance, repair, or even simply just learning about the inner workings of a particular vehicle.
Good luck and happy soundproofing!

2 comments
Comments are closed.